🔶Asset Manager
Overview
-
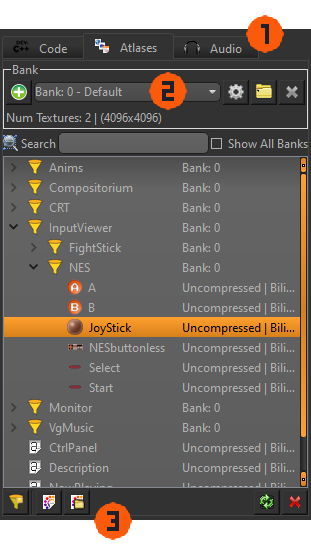
ㅤEach tab along the top independently manages a different type of asset:
 Code: Your C++ source code files and builds.
 Atlases: Image files, combined into texture atlas banks.
 Audio: Sound files, including music and sound effects.
-
ㅤBanks are used to group assets that are likely to be used together. Examples would be grouping assets by game level, or by type (e.g., UI sounds vs. gameplay sounds). More information can be found in the Banks section
Code Assets
Code assets do not use Banks. They instead make Builds, which are entirely different and explained in the Build Settings section.
-
ㅤAlong the bottom are the tool buttons that allow you to manage your assets:
 : Add a new C++ class.
 : Create new filter, which is actually creating a folder on your disk to organize your source code.
 : Import already existing code files from a single directory.
 : Import already existing code files from a directory and its subdirectories.
 : Replace selected source code files by selecting the same number of different, existing files.
 : Delete selected source code files.
Warning
These actions do not use an undo/redo system
- : Create new filter, which is essentially a folder to organize your images within a bank.
 : Import specified PNG image files from a single directory.
 : Import all PNG image files from a directory and its subdirectories.
- : Replace selected images by selecting the same number of new assets.
- : Delete selected images.
Warning
These actions do not use an undo/redo system
- : Create new filter, which is essentially a folder to organize your sounds within a bank.
 : Import specified WAV sound files from a single directory.
 : Import all WAV sound files from a directory and its subdirectories.
- : Replace selected sound WAVs by selecting the same number of new assets.
- : Delete selected sounds.
Warning
These actions do not use an undo/redo system
Assets
The assets and filters are shown in the main tree view:
- You can multi-select and drag 'n drop them to new locations.
- Double Left Button an asset will preview it in the Asset Inspector, located in the Auxiliary window.
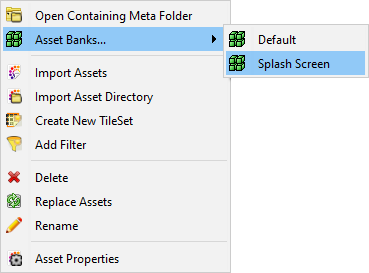
- Right Button an asset will open a context menu with additional options, such as renaming, moving to a different bank, or setting Asset Properties.
- Right Button an asset and selecting Asset Properties will open the Asset Properties dialog.
Banks
Code & Build Management
When you select the Code tab in the Asset Manager, you'll see your game's C++ source code files, including any generated Entity classes in the "_hy_" Entity folder. Along the top of the Asset Manager window, instead of Banks, you'll find Builds. Builds that are created are "out of source" which means keeping the generated build files separate from your game's source code files. So you are free to delete and recreate builds without affecting your source code.
< Show image of top Builds bar >
Build Settings
Build settings are global and affect every build created for this Project. This is where you can select what dependencies to use with your game and the name of the output executable. With the desired Project active, and the Code tab selected in the Asset Manager, click the  Build Settings button.

Output Name is the name of the final executable file created when building your game.
Below that you can choose which 3rd party vendors Harmony will use if you have a preference. The Extras require you to manually install them in the respective HarmonyEngine/Engine/extras/ directory. Follow the instructions in the README.txt file included in each extra's folder.
Adding Additional Library Dependencies
If you need certain code libraries/dependencies to be included in your build click the  Add library dependency button.
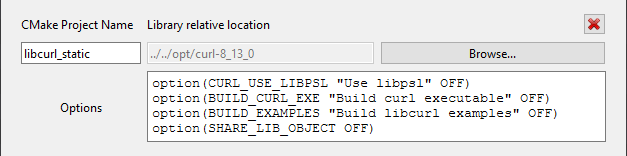
The library dependency must be a CMake compatible package. You must specify the following two fields:
- CMakeLists.txt Project Name: The library target name used within the
add_library()command. - Library relative location: Use the "Browse..." button to select the folder where the library's root
CMakeLists.txtis located
Options can be left blank, but is useful if you want to override default options or inject CMake scripting code. The options are parsed (and cached) before the library is included.
After Adding Dependencies
If you already have an existing build, CMake may try to update the environment automatically after you try to compile. On occasion, CMake errors out and prints setlocal in the output, which may be resolved by deleting and recreating the build.
Creating New Builds
With your Build Settings determined, you can create a new build of your game by clicking the  New Build button.
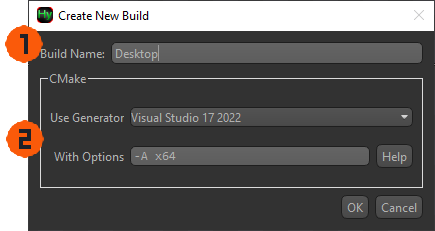
Build Name
Once you created a new build, it will appear in the combo box along in the "Builds" group box.
 : Launches the IDE (or equivalent) of the selected build.
 : Packages the selected build into a distributable format
 : Deletes the selected build and all its generated files (this does not affect your source code files).