🔶Projects
Creating a new Project
To create a new Project in the Project Explorer you can:
- Click the
 button along the top tool bar
 File > New Projectfrom the menu- Press Ctrl+Shift+N
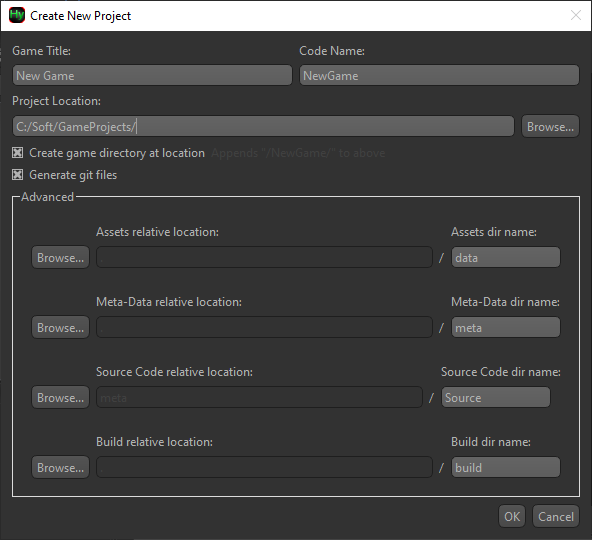
- Game Title is the human readable name of your game, used on labels and titles.
- Code Name will be used to create the main C++ class, and must be compliant with standard naming conventions.
- The final Project Location (where all the project files will be dumped) is assembled by what's specified in the text field PLUS whether Create game directory at location is checked.
- Within Advanced you can customize how the project folders (like the assets or source code) reside and what they're named. You can even specify locations outside the Project Location. For each entry, press Browse... and choose the desired parent location, and the relative path from the Project Location will be filled in. Finally enter the name of the directory itself.
Example Setup
If you want a common location for multiple game projects, specify that root location the text field and keep Create game directory at location checked.
Project Explorer
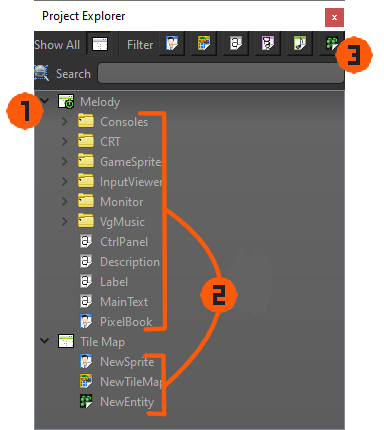
- ㅤAll currently open Projects
 are shown in the tree view here. Nested beneath each Project are the prefix folders containing the Project Items. The currently active project is shown with the
  sub-icon.
 - ㅤYou can drag Project Items between entirely different game Projects to copy them. This will include importing any required assets into the target project.
- ㅤThe search box allows you to filter the visible Project Items in the tree view. You can also filter by item type by selecting the corresponding icon.
Project Settings
Click the  button along the top tool bar, or Right Button on a Project within Project Explorer and select " Project Settings" to open the Project Settings dialog.
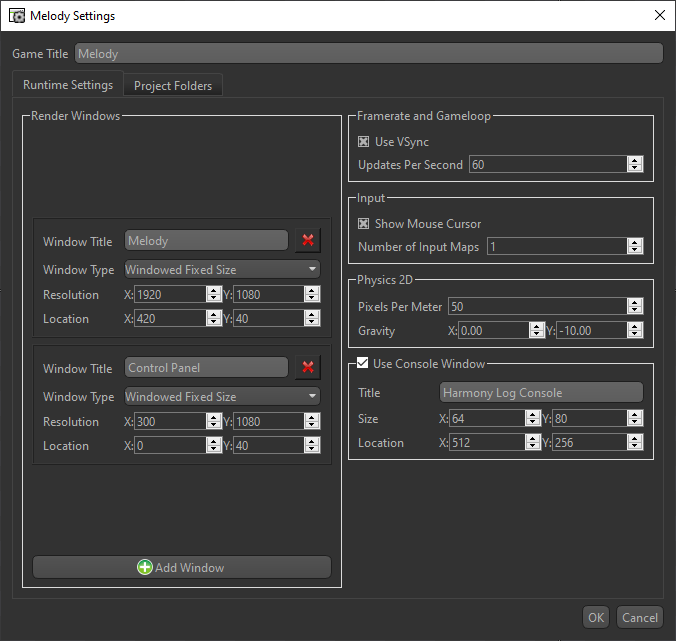
- Render Windows
Most games will only need one window, but if your program requires multiple windows, you can add them here. Each window can have its own Title, Resolution, resize-ability, and starting location. When accessing these windows in code, they are referenced by their order from top to bottom (0-indexed). - Updates Per Second
Sets a fixed update rate for the game loop. Rendering may occur more frequently, but the game logic will only update at this rate. A value of 0 means it will use non-throttled, variable updating, and will match the rendering frame rate. - Show Mouse Cursor
When the mouse cursor is over the game window, it will show the operating system's version of the mouse if this option is checked. Otherwise, the OS's mouse cursor will be hidden while over the game window.
- Number of Input Maps
Input Maps take all the actions the player can perform and assigns inputs to them. You generally set the number of input maps equal to the number of local players your game supports. Each player will have their own input map. - Pixels Per Meter
Sets the scale of the physics simulation. This value defines how many pixels in the game world correspond to one meter in the physics engine. Adjusting this value can affect the feel of movement and collisions in your game. - Gravity
Direction of the world's gravity vector, measured in meters per second squared (m/s²). Harmony's world up is positive Y. - Use Console Window
When checked, a separate console window will open alongside your game. This is useful for debugging, as it can display log messages, errors, and other output from your game. The Size is not the resolution of the console window, but rather the number of text columns and rows it can display at once. Location is desktop coordinates like how Render Windows are positioned.